FinBook User Guide
Table of Contents
-
Introduction
1.1. What is FinBook?
-
How to use this User Guide?
2.1. Icons and symbols
2.2. User Interface (UI) of FinBook
2.3. Command format
2.3.1. Prefix format
-
Quick Start
-
Features
4.1. Managing a client
4.1.1. Adding a client:add
4.1.2. Editing a client:edit
4.1.3. Removing a client’s details:remove
4.1.4. Deleting a client:delete
4.1.4.1. Deleting a single client
4.1.4.2. Deleting multiple clients
4.1.5. Listing all clients:list
4.1.6. Finding a client:find
4.1.7. Viewing Portfolio of a specific client:view
4.2. Data privacy
4.2.1. Locking the application:lock
4.2.2. Setting or updating the password:password
4.2.3. Resetting the password
4.2.4. Hiding sensitive data
4.3. General
4.3.1. Saving the data
4.3.2. Editing the data file
4.3.3. Importing data:import
4.3.4. Exporting data:export
4.3.5. Copying a client’s data:copy
4.3.6. Sorting clients:sort
4.3.7. Changing Light/Dark mode
4.3.8. Exiting the application:exit
-
FAQ
-
Glossary
-
Command Summary
1. Introduction
1.1. What is FinBook?
FinBook is a desktop application for you as a Financial Advisor (FA) to manage your client details and ensure that your data is secured. With FinBook, you can set a unique password, manage and view client’s details, meetings and portfolio as well as many other features to make your daily workflow much more efficient!
FinBook is optimized for use via a Command Line Interface (CLI), which means most of our commands are done by typing. If you can type fast, managing your clients will be a breeze with FinBook. Can’t type fast? Don’t worry! Our Graphical User Interface (GUI) will help you slowly adjust to using our CLI.
So what are you waiting for? Start using FinBook.
2. How to Use this User Guide?
- To get familiar with this user guide you can continue reading, How to Use this User Guide.
- If you are a new user, you can get started with Quick Start to familiarise yourself with FinBook.
- If you are familiar with FinBook, you can refer to the Features to see details of all available commands or refer at Command Summary.
2.1. Icons and symbols
| Symbol | Meaning |
|---|---|
| Additional information that may be useful to know when using FinBook | |
| Important information or warnings that you should take note of when using FinBook | |
command |
The highlighted words indicate a command that can be typed into the Command Box of FinBook |
2.2. User Interface (UI) of FinBook
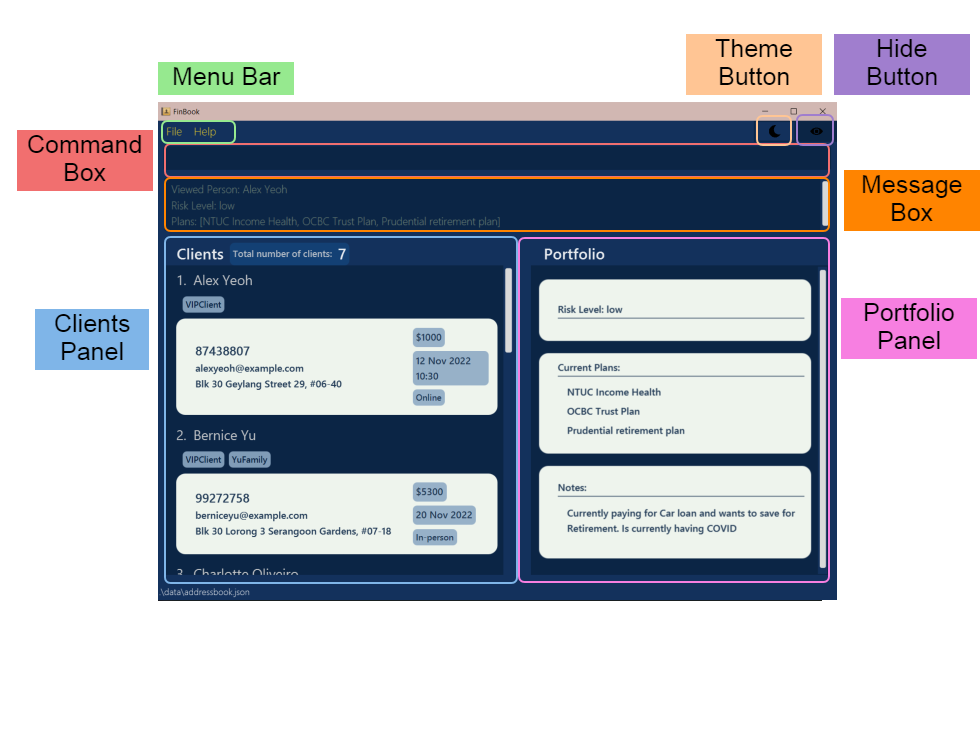
The UI consists of:
| Components | Purpose |
|---|---|
| Menu Bar | Consists of File and Help |
| Theme Button | To toggle between Light/Dark mode |
| Hide Button | To toggle between hide and unhide mode |
| Command Box | To enter commands to be executed |
| Message Box | Display results of executed command |
| Clients Panel | Displays clients of FinBook |
| Portfolio View | Displays portfolio of selected client |
2.3. Command format
Commands in FinBook are constructed using a command word. Most commands consist of a command word, prefixes and parameters
For example,

-
Command word: Indicates what action you want FinBook to do. For this example, the command word
addwill add a client into FinBook -
Prefix: To specify the field of data added. Each prefix always ends with a
/. For this example,n/indicates the client’s name,p/indicates the client’s phone number, etc. -
Parameter: Provides supplementary information to the command word or prefix. For this example,
John Doeis the parameter forNAME
![]() Notes about the command format:
Notes about the command format:
-
Words in
UPPER_CASEare the parameters to be supplied by the user.
e.g. inadd n/NAME,NAMEis a parameter which can be used asadd n/John Doe. -
Items in square brackets are optional.
e.gn/NAME [t/TAG]can be used asn/John Doe t/VIPClientor asn/John Doe. -
Items with
… after them can be used multiple times including zero times.
e.g.[t/TAG]…can be used as ` ` (i.e. 0 times),t/VIPClient,t/VIPClient t/DoeFamilyetc. -
Parameters can be in any order.
e.g. if the command specifiesn/NAME p/PHONE_NUMBER,p/PHONE_NUMBER n/NAMEis also acceptable. -
If a parameter is expected only once in the command but you specified it multiple times, only the last occurrence of the parameter will be taken.
e.g. if you specifyp/12341234 p/56785678, onlyp/56785678will be taken. -
Extraneous parameters for commands that do not take in parameters (such as
help,list,exitanddelete all) will be ignored.
e.g. if the command specifieshelp 123, it will be interpreted ashelp.
2.3.1. Prefix format
NAME - n/ :
Name of a client.
Parameter restrictions: Only standard English characters are allowed, and it should not be blank.
Examples:
- Valid:
John Doe,Alex Yeoh - Invalid:
Александр,语嫣
PHONE - p/ :
Phone number of a client.
Parameter restrictions: Phone numbers should only contain numbers and be at least 3 digits long, and it should not
be blank.
Examples:
- Valid:
999,12345678 - Invalid:
10,+6512345678
EMAIL - e/ :
Email of client.
Parameter description: Emails should be of the format local-part@domain and adhere to the following
constraints:
- The local-part should only contain alphanumeric characters and these special characters, excluding the parentheses, (
+_.-). The local-part may not start or end with any special characters.
- This is followed by a ‘@’ and then a domain name. The domain name is made up of domain labels separated by
periods.
The domain name must:
- end with a domain label at least 2 characters long
- have each domain label start and end with alphanumeric characters
- have each domain label consist of alphanumeric characters, separated only by hyphens, if
any.
Examples:
- Valid:
john@gmail.com,jo_doe@abc.com.sg - Invalid:
john_@example.com,john@example_.com
ADDRESS - a/ :
Address of client.
Parameter restrictions: Addresses can take any values, and it should not be blank.
Examples:
- Valid:
Blk 123 @Flower Street #01-01,abc
INCOME - i/ :
Income of client.
Parameter restrictions: Income should start with $ followed by numbers and should be at least 1 digit long, and it
should not be blank.
Examples:
- Valid:
$8250,$0 - Invalid:
$10k,5000
MEETINGDATE or MEETINGDATEWITHTIME - m/ :
Date and time of meeting with client.
Parameter restrictions: Date should be in the form of dd MMM yyyy [HH:mm]. Meeting time is optional.
Examples:
- Valid:
20 Nov 2022,05 Oct 2023 10:30 - Invalid:
13-Aug-2022,15 Jul 2023 16.30
MEETINGLOCATION - ml/ :
Location of meeting with client.
Parameter restrictions:
- Location can be in the form of either an address (for in-person meetings), or a link (for online meetings).
- Addresses can take any values, and it should not be blank.
Links should be of the format protocol://host, and links compliant with the format will be automatically detected by
Finbook, and the meeting will be automatically categorised as online.
Examples:
- Valid:
13 Computing Drive,https://nus-sg.zoom.us/
TAG - t/ :
Tag of client.
Parameter restrictions: Tags names should be alphanumeric.
Examples:
- Valid:
VIPClient,10 - Invalid:
VIP-Client,*
RISK - r/ :
Risk level of client’s portfolio.
Parameter restrictions: Risk level can take any value.
Examples:
- Valid:
High,abc,10
PLANS - pl/ :
Plans regarding client’s portfolio.
Parameter restrictions: Plan name can take any value.
Examples:
- Valid:
NTUC Income Plan,OCBC Plan 2020
ADDITIONAL NOTES - note/ :
Additional notes to client’s portfolio.
Parameter restrictions: Notes can take any value.
Examples:
- Valid:
Plans to save for retirement,Currently have COVID
3. Quick start
-
Ensure you have Java
11or above installed in your computer. -
Download the latest
FinBook.jarfrom here. -
Copy the file to the folder you want to use as the home folder for your FinBook.
-
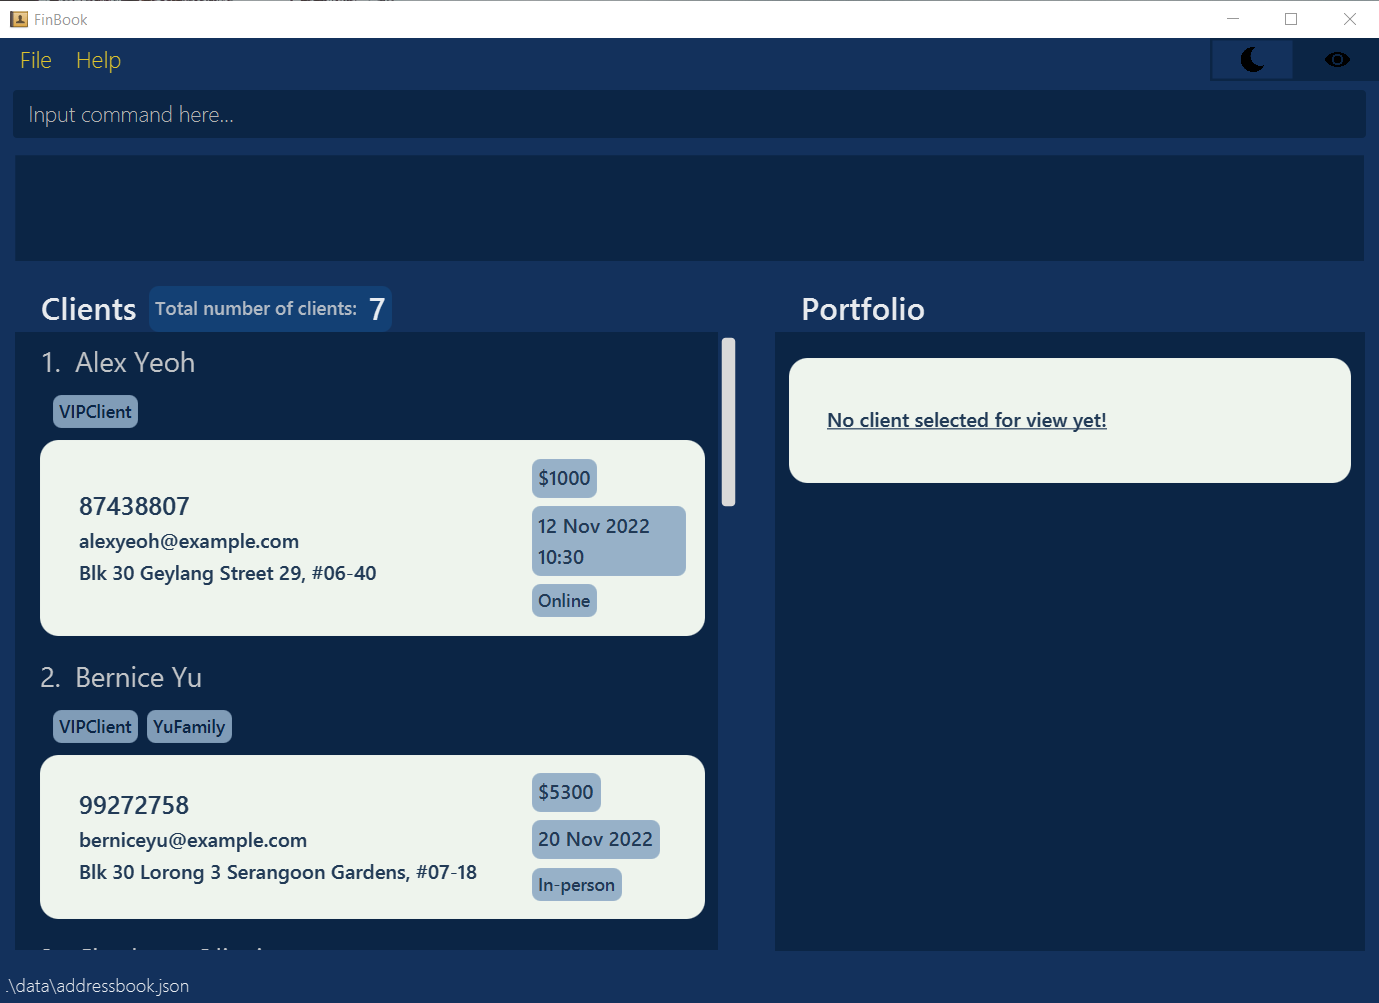
Double-click the file to start the app. The GUI similar to the image below should appear in a few seconds. Note how the app contains some sample data.
-
Type the command in the command box and press Enter to execute it. e.g. typing
helpand pressing Enter will open the help window.
Some example commands you can try:-
list: Lists all contacts. -
addn/John Doe p/98765432 e/johnd@example.com a/John street, block 123, #01-01 i/$1000: Adds a client namedJohn Doein FinBook. -
edit1 r/Low pl/NTUC Income Plan: Edits the 1st client portfolio risk and plans shown in the current list. -
delete3: Deletes the 3rd client shown in the current list. -
delete all: Deletes all clients. -
exit: Exits the app.
-
-
Refer to the Features below for details of each command.
4. Features
4.1. Managing a client
4.1.1. Adding a client: add
Adds a client to the FinBook so that you will not forget your client’s personal information.
Format: add n/NAME p/PHONE_NUMBER e/EMAIL a/ADDRESS i/MONTHLY_INCOME [m/UPCOMING_MEETING_DATES] [ml/MEETING_LOCATION]
[t/TAGS] [r/RISK_LEVEL] [pl/CURRENT_PLANS] [note/ADDITIONAL_NOTES]
Examples:
-
add n/John Doe p/98765432 e/johnd@example.com a/John street, block 123, #01-01 i/$100000 m/12 Jan 2022 16:30 t/VIPClient
r/high pl/Prudential Health note/Client is currently having COVID
adds a client named John Doe, with a mobile number of 98765432, email address of johnd@example.com etc. to the client list. -
add n/Betsy Crowe t/VIPPClient e/betsycrowe@example.com a/ABC street p/1234567 i/$10 m/23 Feb 2022 r/low pl/NTUC Income Planadds a client named Betsy Crowe, with a mobile number of 1234567, email address of betsycrowe@example.com etc. to the client list.
 |
|---|
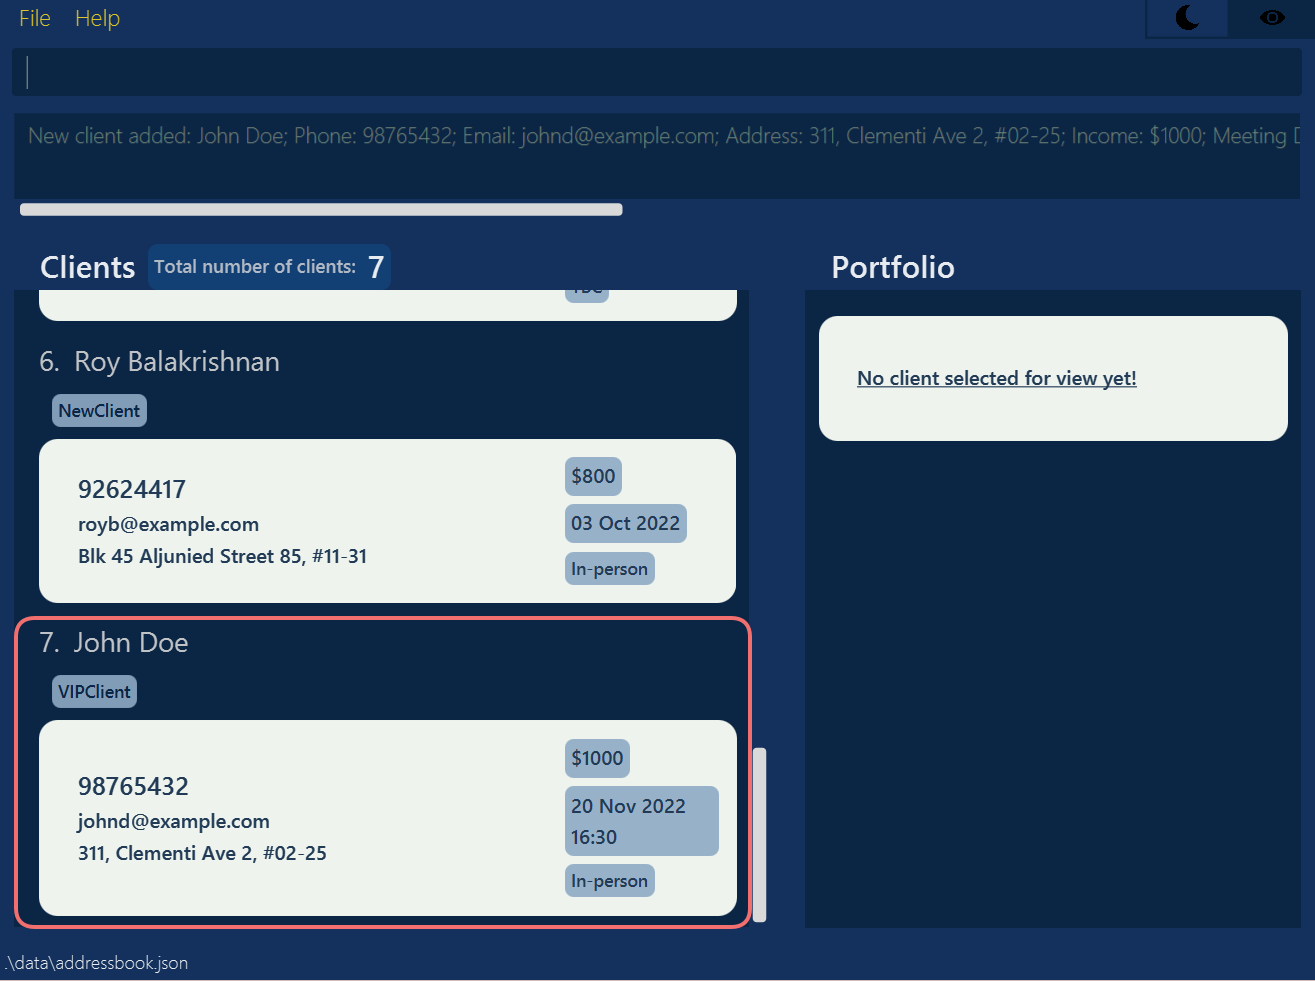
Used command: add n/John Doe p/98765432 e/johnd@example.com a/311, Clementi Ave 2, #02-25 i/$1000 m/20 Nov 2022 16:30 ml/13 Computing Drive t/VIPClient r/High pl/Prudential Retirement Plan note/currently having COVID to add John Doe to the client list |
![]() Notes:
Notes:
-
addcommand will refresh the portfolio panel to display “no client selected for view yet!”. -
m/UPCOMING_MEETING_DATEScan be in thedd Mmm yyyyordd Mmm yyyy HH:mmformat. - The income
i/, meeting datem/, meeting locationml/, tagst/, riskr/, planspl/and notesnote/fields are optional fields, and you may leave them empty.
e.g.
add n/Johnny n/John p/98765432 e/johnd@example.com a/John street, block 123, #01-01 i/$100000 will take the client’s name to be John.
4.1.2. Editing a client : edit
Edits an existing client in the FinBook so that you can maintain an updated list of your clients’ personal information when your client’s information change.
Format: edit INDEX [n/NAME] [p/PHONE] [e/EMAIL] [a/ADDRESS] [i/MONTHLY_INCOME] [m/UPCOMING_MEETING_DATES]
[ml/MEETING_LOCATION] [t/TAGS] [r/RISK_LEVEL] [pl/CURRENT_PLANS] [note/ADDITIONAL_NOTES]
- Edits the client at the specified
INDEX. The index refers to the index number shown in the displayed client list. The index must be a positive integer 1, 2, 3, … - For parameters that are not tags, plans or notes, existing values will be overwritten by the input values.
- For tags, plans, or notes, the input values will be added to existing values, so you do not have to type everything again when you want to add a tag, plan, or note.
-
editcommand will automatically view the updated portfolio of the edited client.
Examples:
-
edit 1 p/91234567 e/johndoe@example.comEdits the phone number and email address of the 1st client to be91234567andjohndoe@example.comrespectively and automatically displays the updated portfolio of the 1st client. -
edit 2 n/Betsy CrowerEdits the name of the 2nd client to beBetsy Crowerand automatically displays the updated portfolio ofBetsy Crower.
![]() Notes:
Notes:
-
editcommand will automatically view the updated portfolio of the edited client. - To remove tags, plans, or notes, refer
to 4.1.3. Removing a client’s details :
remove
4.1.3. Removing a client’s details : remove
Removes an existing client’s tags, plans, or notes in the FinBook so that you can maintain an updated list of your clients’ personal information when your client’s information change.
Format: remove INDEX [t/TAGS] [pl/CURRENT_PLANS] [note/ADDITIONAL_NOTES]
- Edits the client at the specified
INDEX. The index refers to the index number shown in the displayed client list. The index must be a positive integer 1, 2, 3, … - At least one of the optional fields must be provided.
- The input values will be removed from existing tags, plans or notes.
-
removecommand will automatically view the updated portfolio of the edited client.
Examples:
-
remove 1 t/friends pl/NTUC Income HealthRemoves the tagfriendsand the planNTUC Income Healthfrom the 1st client, and automatically displays the updated portfolio of the 1st client. -
remove 2 note/Plans to save for college educationRemoves the notePlans to save for college educationfrom the 2nd client, and automatically displays the updated portfolio of the 2nd client.
![]() Notes:
Notes:
-
removecommand will automatically view the updated portfolio of the edited client. - Any input tags, plans or notes not currently on the client will be ignored. For example, using
remove 1 t/friendswhen the 1st client does not currently possess thefriendstag is valid, and will simply just view the portfolio of the 1st client as it is currently.
4.1.4. Deleting a client : delete
Four formats of deleting a client so that you can easily so that maintain an updated list of your clients’ personal information.
delete INDEXdelete INDEX1, INDEX2, …delete STARTINDEX - ENDINDEXdelete all
- The index refers to the index number shown in the displayed client list.
- The index must be a positive integer 1, 2, 3, …
-
deletecommand will refresh the portfolio panel to display “no client selected for view yet!”.
4.1.4.1. Deleting a single client
Deletes the specified client from the FinBook.
Format: delete INDEX
- Deletes the client at the specified
INDEX.
Examples:
-
listfollowed bydelete 2deletes the 2nd client in the FinBook. -
find Betsyfollowed bydelete 1deletes the 1st client in the results of thefindcommand.
4.1.4.2. Deleting multiple clients
Deletes multiple specified clients from the FinBook.
Format: delete INDEX1, INDEX2, …
- Deletes the client at the specified
INDEX1,INDEX2, and so on. - Value of
INDEX1,INDEX2, … cannot contain any repeated values.
Example:
-
listfollowed bydelete 1, 2, 5deletes the 1st, 2nd and 5th client in the FinBook.
Deletes a range of clients from the FinBook.
Format: delete STARTINDEDX - ENDINDEX
- Deletes the client from
STARTINDEXtoENDINDEXinclusive. - Value of
STARTINDEXmust be smaller thanENDINDEX.
Example:
-
listfollowed bydelete 1-3deletes the 1st, 2nd and 3rd client in the FinBook.
Deletes all clients from the FinBook.
Format: delete all
- Deletes all clients in FinBook.
Example:
-
listfollowed bydelete alldeletes the all clients in the FinBook.
4.1.5. Listing all clients : list
Shows a list of all clients in the FinBook so that you can see the complete list of all your clients at a glance.
Format: list
4.1.6. Finding a client : find
Finds all clients whose names or tags contain any of the specified keywords (case-insensitive) and displays them as a list with index numbers, so that you can find the client you are looking for without having to scroll through all of your clients.
Format: find [n/NAME] [t/TAG]
- Updated list of clients whose name or tag contain any of the specified keywords is displayed in the list of clients on the left.
- At least one of the parameters must be provided.
- Only one type of parameter can be provided at one time.
-
findcommand will refresh the portfolio panel to display “no client selected for view yet!”.
Examples:
-
find n/John n/alexwill find all clients with John or Alex in their names. -
find t/VIPClient t/YuFamilywill find all clients with eitherVIPClientorYuFamilytags.
4.1.7. Viewing Portfolio of a specific client: view
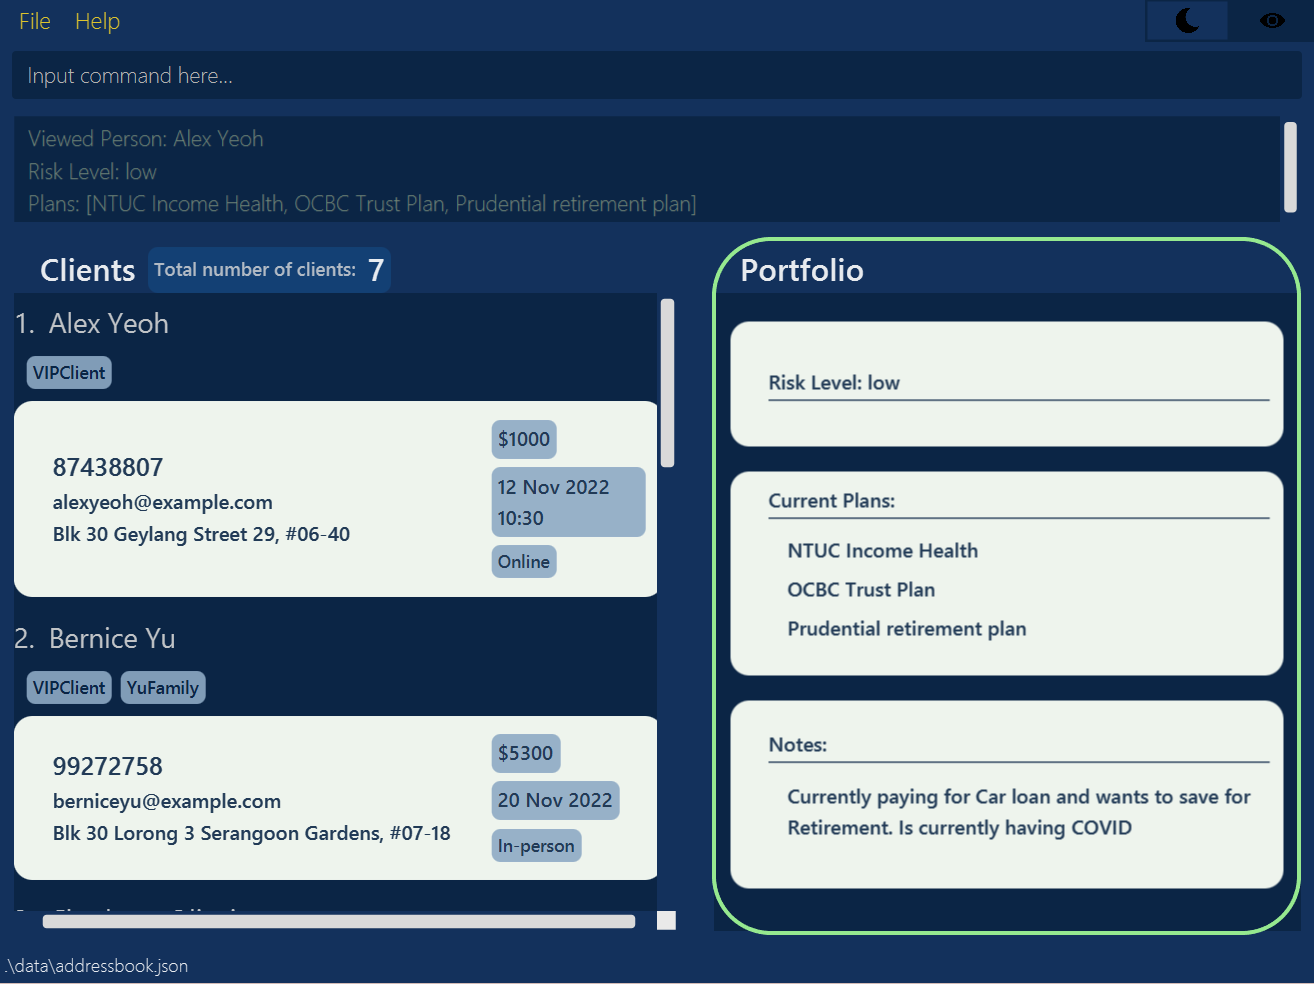
Views a specific’s client portfolio so that you can analyse each client before their meeting.
Format: view INDEX
- Displays the portfolio of client at index
INDEXon the Portfolio section. - Portfolio includes risk level, current plans purchased by the client and additional remarks.
Examples:
-
view 1displays the risk level and current plans purchased by the 1st client of the Financial book data. -
view 2displays the risk level and current plans purchased by the 2nd client of the Financial book data. -
find n/Alexthenview 1will display the portfolio of Alex.
 |
|---|
Used command: view 1 to view portfolio of Alex Yeoh |
![]() Notes:
Notes:
-
findcommand thenview INDEXwill display the portfolio according to the newINDEXgiven according to the updated client list. -
sortcommand thenview INDEXwill display the portfolio according to the newINDEXgiven according to the updated client list.
4.2. Data privacy
4.2.1. Locking the application : lock
Locks the application.
Format: lock
The following dialog box will be displayed:
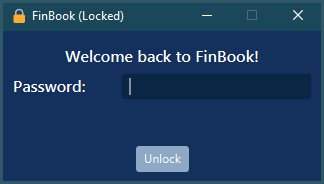 |
|---|
Used command: lock |
![]() Notes:
Notes:
- If a password has not been set, leave the password field empty to unlock the application.
JSON files containing your data.
4.2.2. Setting or updating the password : password
Sets or updates the FinBook password.
Format: password [old/OLDPASSWORD] new/NEWPASSWORD
- Sets or updates the password to the specified new password
- No need to specify old password if setting the password for the first time
- When updating the password, the specified old password must match the current password
- Be mindful of spaces (
" ") at the start and end of the specified password, as they will be trimmed-
Specified password:
" "Effective password: a zero length string
-
Specified password:
" "foobar" "Effective password:
foobar
-
Examples:
-
password new/foobarsets the password tofoobar, given that a password has not yet been set -
password old/foobar new/barfooupdates the password tobarfoo, given that the current password isfoobar.
![]() Notes:
Notes:
- It is recommended to take note of the warnings and follow the suggestions, if there are any.
4.2.3. Resetting the password
Steps to reset the password:
- Close FinBook
- Locate
preferences.json(default location is in the same directory as the FinBook executable) - Open
preferences.jsonwith a text editor - Change the line
"passwordHash" : "$argon2id$xxxxxxxx"to"passwordHash" : "" - Save
preferences.json
4.2.4. Hiding sensitive data
Toggles the visibility of FinBook by clicking on the open eye or closed eye icon on the top right of the
application.
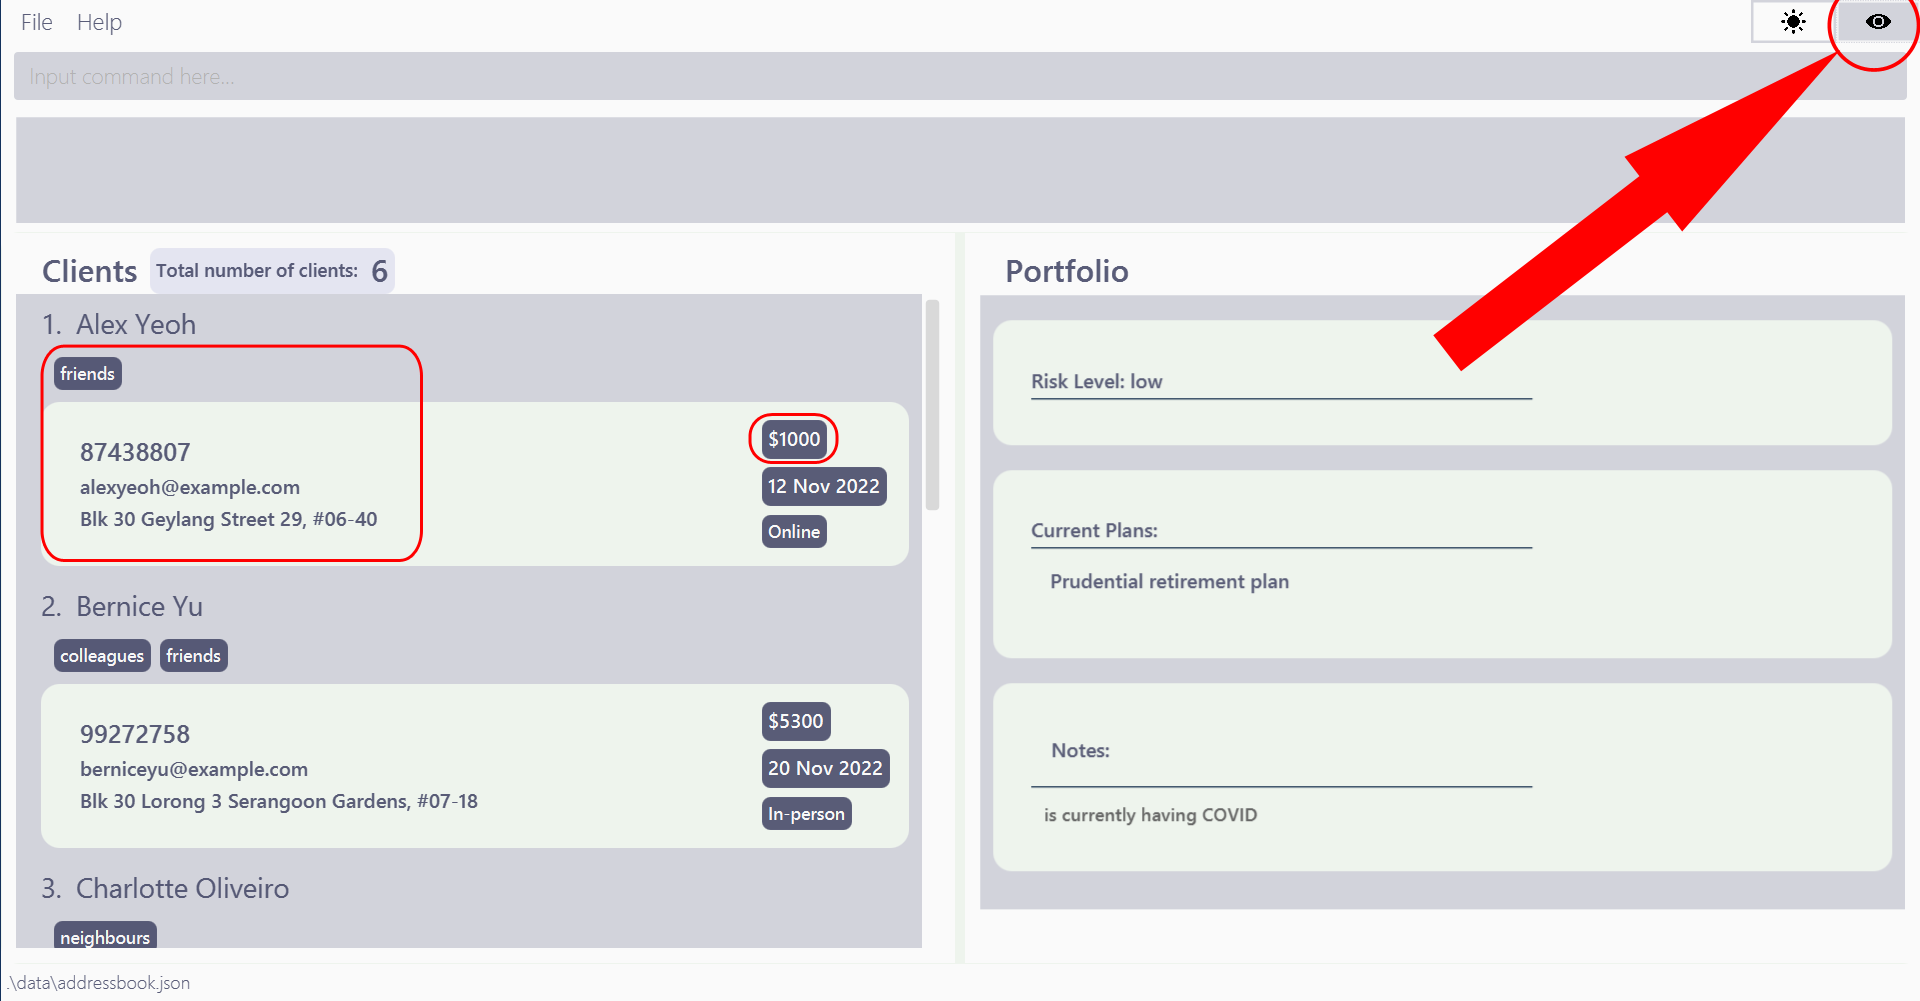 |
|---|
If the icon is an open eye FinBook displays all client data. |
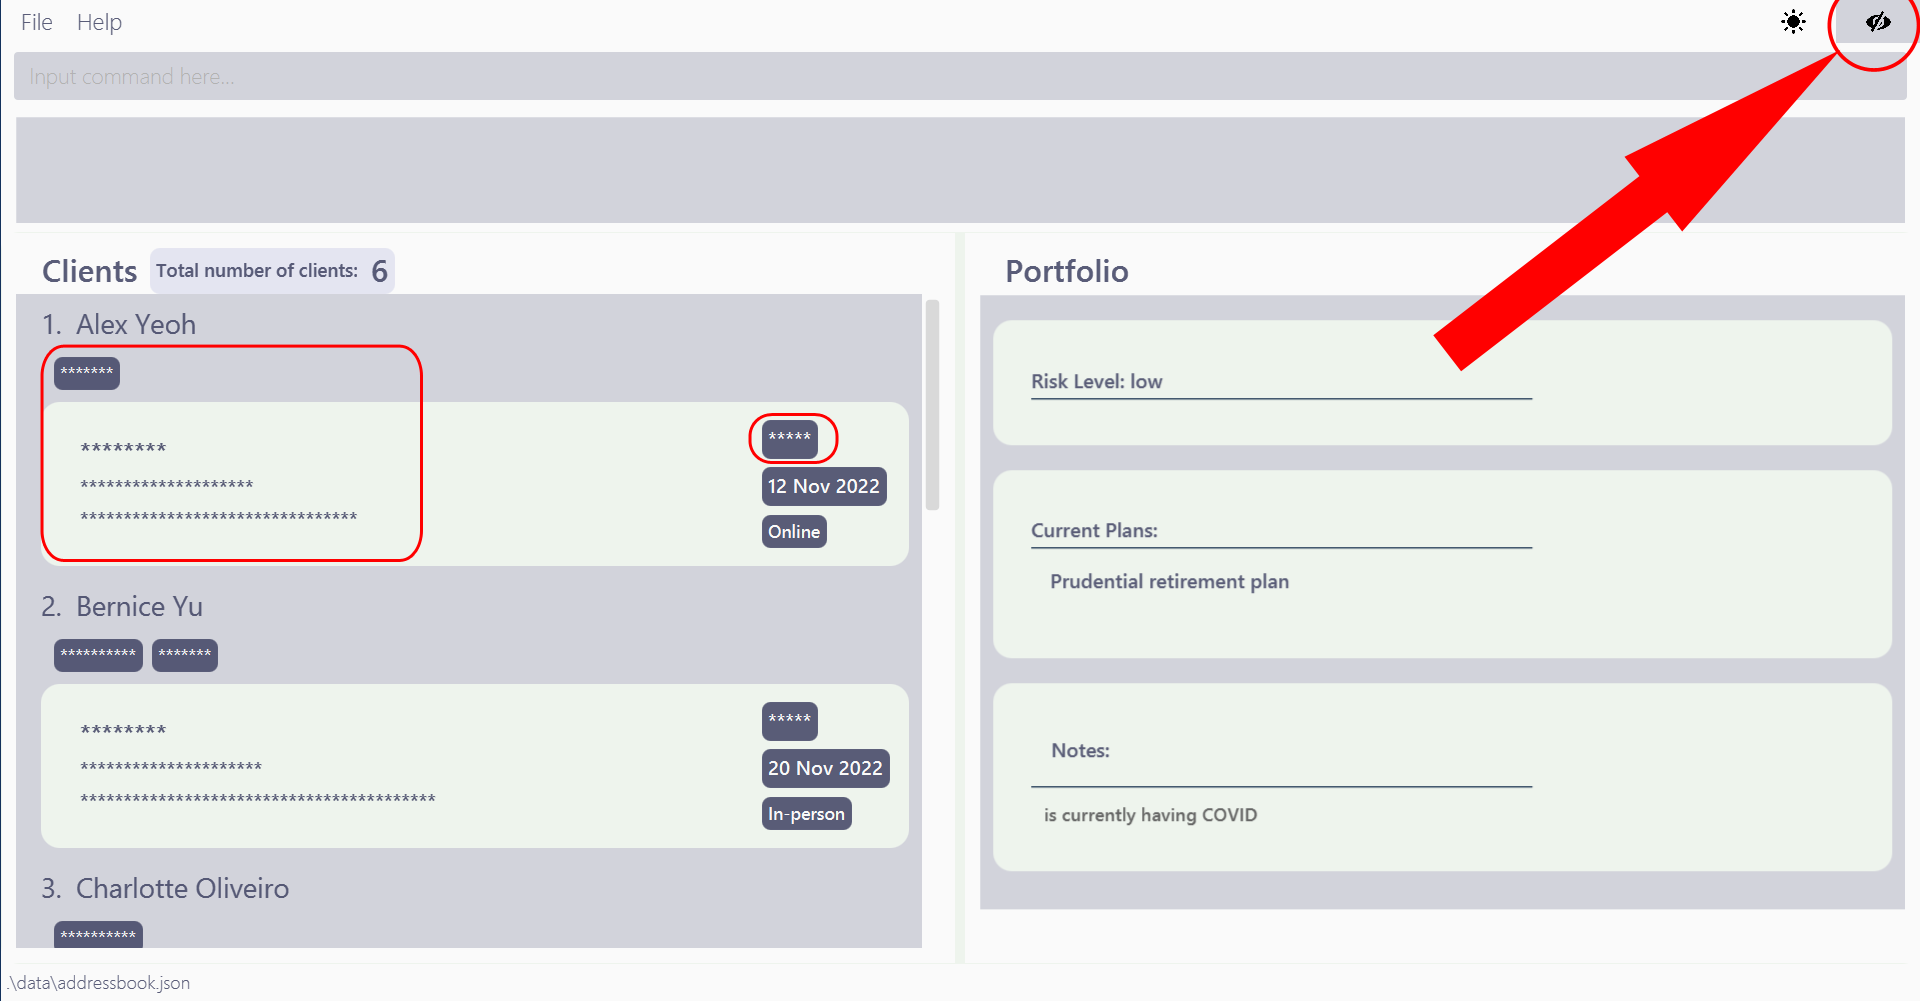 |
|---|
If the icon is a closed eye FinBook hides all sensitive client data. |
![]() Notes:
Notes:
- Your mode preference will be automatically saved.
4.3. General
4.3.1. Saving the data
Financial book data are saved in the hard disk automatically after any command that changes the data. There is no need to save manually.
4.3.2. Editing the data file
Financial book data are saved as a JSON file [JAR file location]/data/addressbook.json. Advanced users are welcome
to
update data directly by editing that data file.
4.3.3. Importing data : import
Imports data from a JSON or CSV file.
-
JSONfiles must be saved by the latest version of FinBook -
CSVfiles must be formatted correctly as follows:- The first line of the file must contain these headers in any order:
namephoneemailaddressincomemeeting datetagsriskplans- The data in each corresponding column must be valid
-
tagsmust be separated by commas,without spaces (e.g.VIPPClient,YuFamily) -
plansmust be separated by commas,without spaces ( e.g.prudential income,NTUC income,prudential health)
-
- The first line of the file must contain these headers in any order:
Format: import PATH
- Imports data from the file at the specified
PATH -
PATHcan be a relative or full path -
PATHmust end in.jsonor.csv
Examples:
-
import ./data.jsonimports data from the filedata.jsonwhich is located in the same directory as the FinBook executable -
import ../data.csvimports data from the filedata.csvwhich is located one level outside the directory of the FinBook executable
4.3.4. Exporting data : export
Exports data to a CSV file.
Format: export PATH
- Exports data to the file at the specified
PATH -
PATHcan be a relative or full path -
PATHmust end in.csv
Examples:
-
export ./data.csvexports data to the filedata.csvwhich is located in the same directory as the FinBook executable -
export ../data.csvexports data to the filedata.csvwhich is located one level outside the directory of the FinBook executable
4.3.5. Copying a client’s data : copy
Copies the data of an existing client in the FinBook into your Computer’s clipboard.
Format: copy INDEX
Example: copy 2 with the sample data will result a copied output of:
Name: Bernice Yu
Phone: 99272758
Email: berniceyu@example.com
Address: Blk 30 Lorong 3 Serangoon Gardens, #07-18
Income: $5300
Meeting date: 20 Nov 2022
Meeting Location: 21 Lower Kent Ridge Rd, Singapore 119077
Tags: VIPClient, YuFamily
Risk: high
Plans: Education Savings Plan
Note: Plans to save for College Education
- Press
Ctrl-Vto paste the copied text.
![]() Notes:
Notes:
-
copycommand will automatically view the updated portfolio of the copied client.
4.3.6. Sorting clients : sort
Sorts clients in the FinBook according to given parameter.
Format: sort n/ OR i/ OR m/
- At least one parameter must be provided.
- Only one type of parameter can be provided at one time.
- Sorts clients in ascending order according to the parameter.
Examples:
-
sort n/Sorts clients in ascending order according to name. -
sort i/Sorts clients in ascending order according to income. -
sort m/Sorts clients according to their meeting dates in chronological order.
4.3.7. Changing Light/Dark mode
Toggles the theme of FinBook by clicking on the sun or moon icon on the top right of the application.
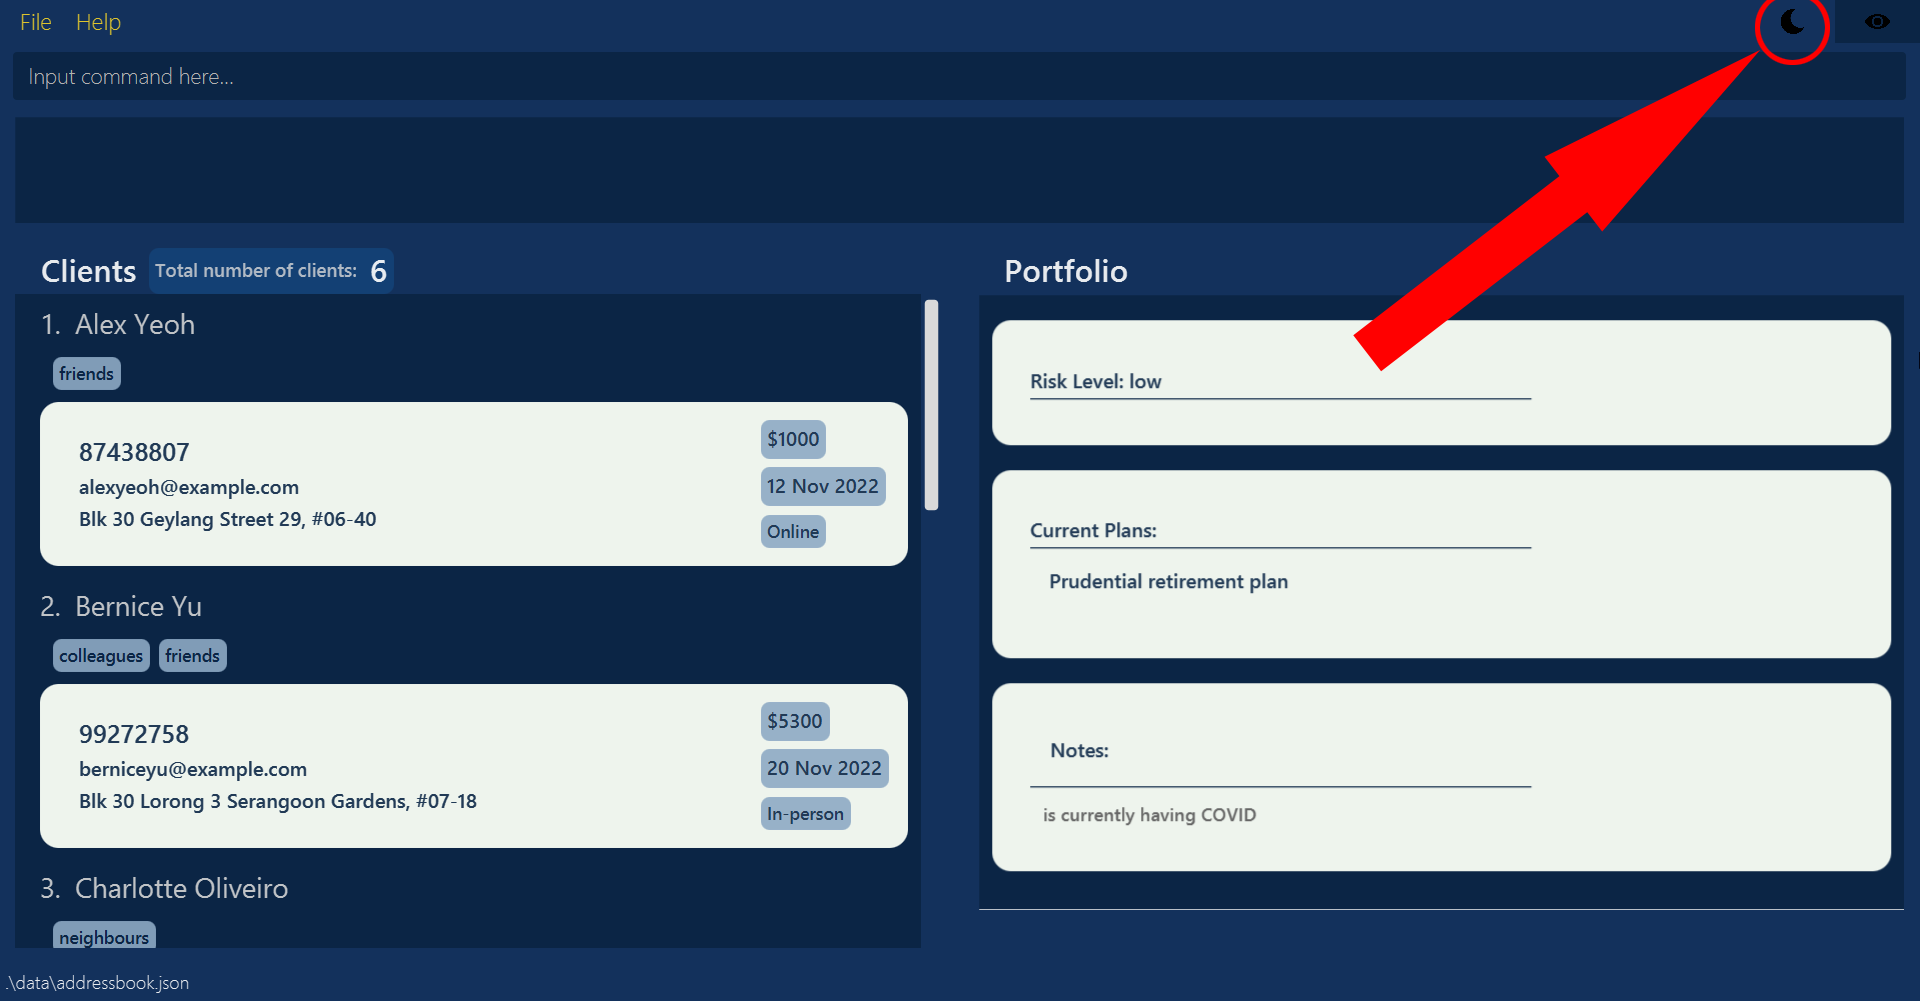 |
|---|
If icon is a moon FinBook is in Dark mode. |
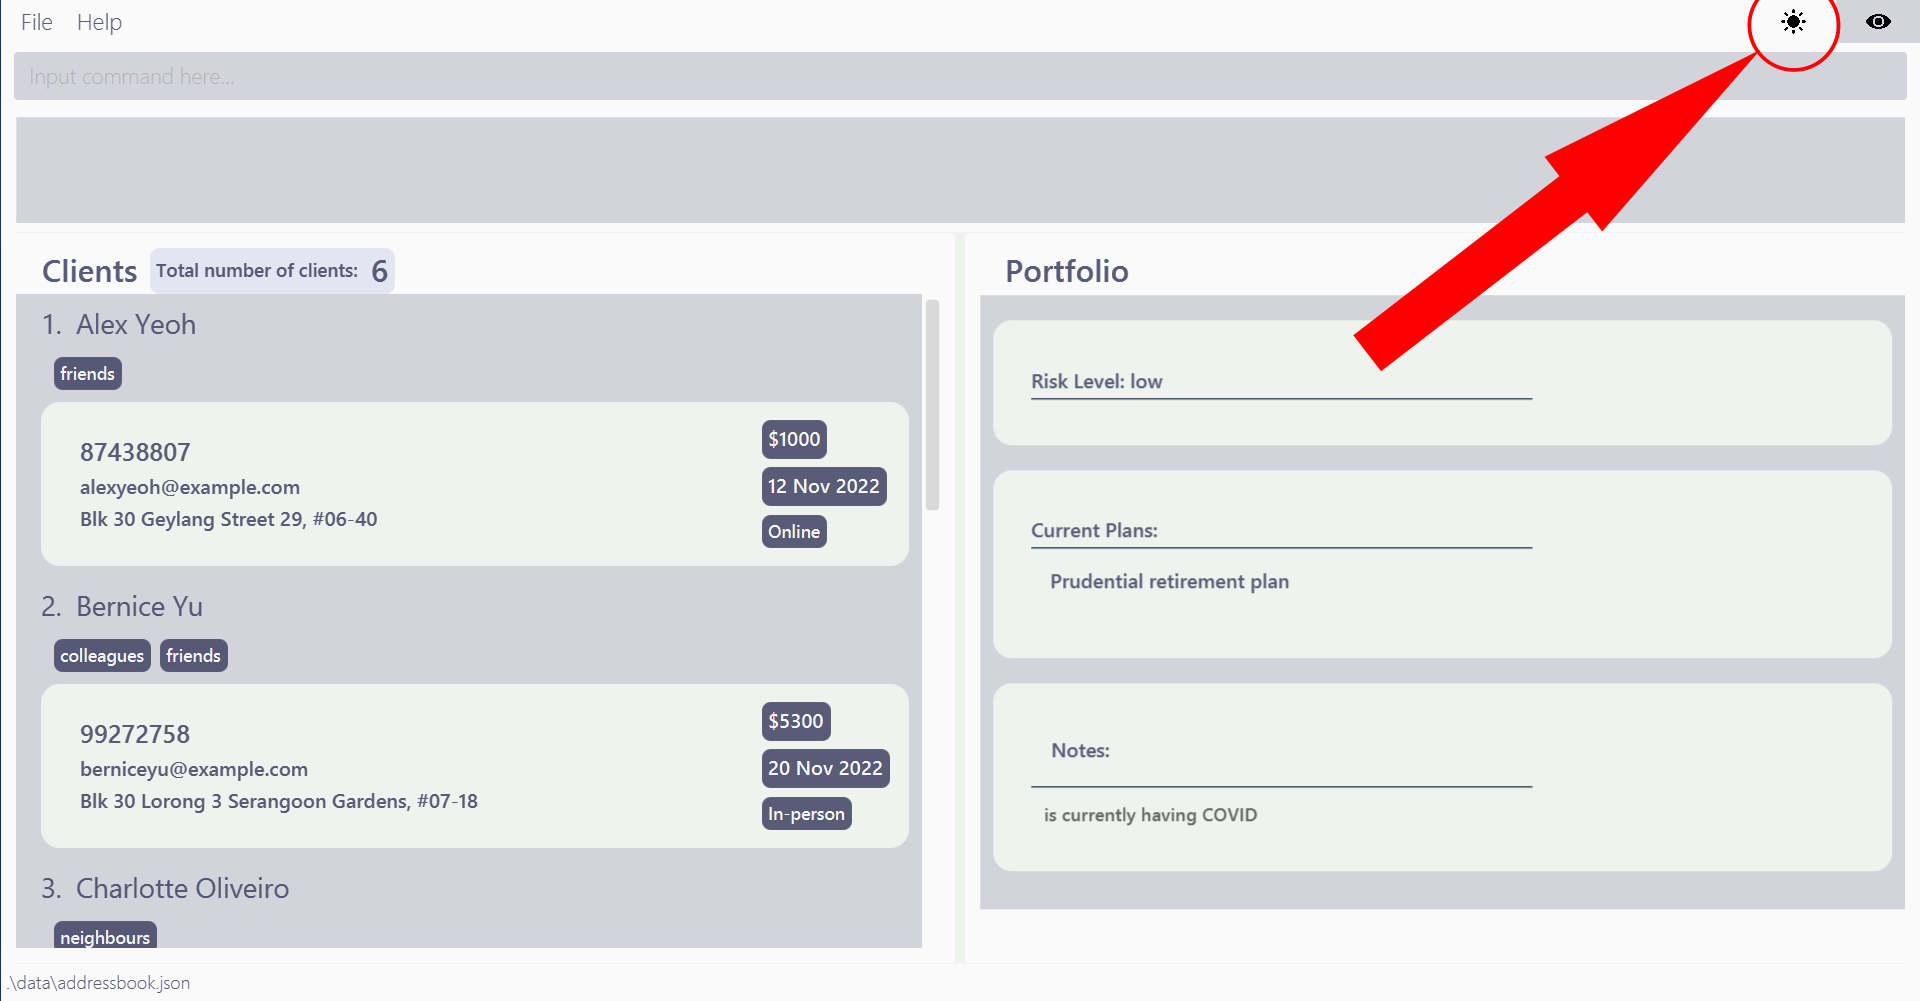 |
|---|
If icon is a sun FinBook is in Light mode. |
![]() Notes:
Notes:
- Your mode preference will be automatically saved.
4.3.8. Exiting the application : exit
Exits the application.
Format: exit
5. FAQ
Q: How do I transfer my data to another Computer?
A: Install the app in the other computer and overwrite the empty data file it creates with the file that contains
the data of your previous FinBook home folder. Alternatively, you may use the export and import commands.
Q: If I do not have Java 11, how do I install it on my computer?
A: You can navigate to this site here and download Java 11 according to your system’s specifications.
Q: Do I need an internet connection to run FinBook?
A: No, FinBook can boot up and run all functionalities without an internet connection.
Q: Can I use FinBook on my mobile device?
A: No, FinBook is only designed to run on your desktop/laptop.
6. Glossary
| Term | Meaning |
|---|---|
| Command-line Interface (CLI) | A application that users interact with by typing text. |
| Command | A sequence specified text typed by the user to perform an action. |
| Prefix | A tag to specify the field of data added. Each prefix always ends with a /. |
| Parameter | Users input to a command. |
| Field | The data type of client. For example, Name and Income are fields of a client. |
| JSON | JSON (JavaScript Object Notation) is an open standard file format and data interchange format that uses human-readable text to store and transmit data objects consisting of attribute–value pairs and arrays (or other serializable values). |
| CSV | A comma-separated values (CSV) file is a delimited text file that uses a comma to separate values. |
| Path | A path is a string of characters used to uniquely identify a location in a directory structure. |
7. Command summary
| Action | Format, Examples |
|---|---|
| Add |
add n/NAME p/PHONE_NUMBER e/EMAIL a/ADDRESS i/MONTHLY_INCOME [m/UPCOMING_MEETING_DATES] [t/TAGS] [r/RISK_LEVEL] [pl/CURRENT_PLANS] [note/ADDITIONAL_NOTES] e.g., add n/John Doe p/98765432 e/johnd@example.com a/John street, block 123, #01-01 i/$100000 m/12 Jan 2022 t/VIPClient r/high pl/Prudential Health note/Client is currently having COVID
|
| Delete |
delete INDEX delete INDEX1, INDEX2, … delete STARTINDEX - ENDINDEX delete all e.g., delete 3 delete 1, 2, 5 delete 2-5
|
| Copy |
copy INDEX e.g., copy 1
|
| Edit |
edit INDEX [n/NAME] [p/PHONE_NUMBER] [e/EMAIL] [a/ADDRESS] [t/TAG] [r/RISK_LEVEL] [pl/CURRENT_PLANS] [note/ADDITIONAL_NOTES]e.g., edit 2 n/James Lee e/jameslee@example.com
|
| List | list |
| Find |
find [n/NAME] [t/TAG] e.g., find t/VIPClient
|
| View Portfolio |
view INDEX e.g., view 1
|
| Lock application | lock |
| Password |
password [old/OLDPASSWORD] new/NEWPASSWORDe.g., password old/foobar new/barfoo
|
| Copy |
copy INDEX e.g., copy 1
|
| Import |
import PATHe.g., import ./data.json
|
| Export |
export PATHe.g., export ./data.csv
|
| Sort |
sort PARAMe.g., sort n/
|
| Exit application | exit |